Guide to managing travelers and rooms in the file interface
This panel can be divided into 4 main parts
Add pax details
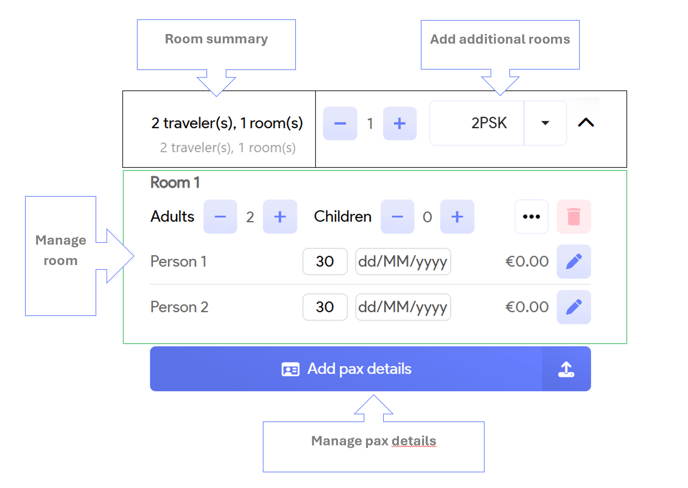
Room summary
This section provides a clear overview of the total number of rooms and travelers associated with the booking. This functionality is particularly beneficial for efficiently managing group bookings.
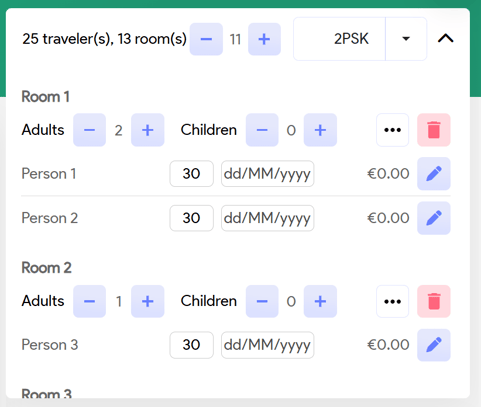
Example group file:
Add additional rooms
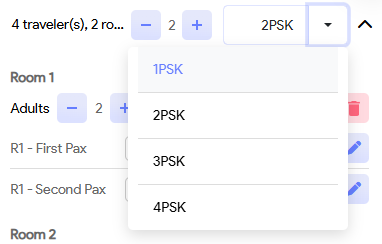
In this section, you have the option to add additional rooms to your file. This section is divided into 2 parts, quantity field and room type:
![]()
In the quantity field, you can specify the number of rooms you wish to add.
In the room type field, you can choose the room type based on occupancy, such as single, double, or triple rooms.
Selecting or clicking in the room type, will automatically add the desired rooms to your file.
Here are a couple of illustrative examples to guide you through the process.
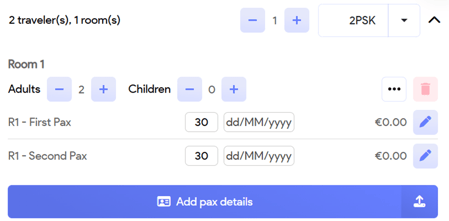
We’ll name our 2 travelers R1-First, Pax & R1-Second, Pax.
R1 serves as a illustrative prefix to differentiate between the rooms in this specific example, with R1 representing the first room and R2 indicating the second,... We will also label our travelers according to the sequence in which they are added to to illustrate the workflow.
Example: Step 0 - starting configuration
This represents the starting configuration of our rooms.
Example: Step 1 - Add a double room
In the following step, we will proceed to add one double room, by clicking into the room type field. As a result, the summary will now reflect that there are a total of 4 travelers accommodated in 2 rooms. Only 1 room was added, as our quantity was left to 1.
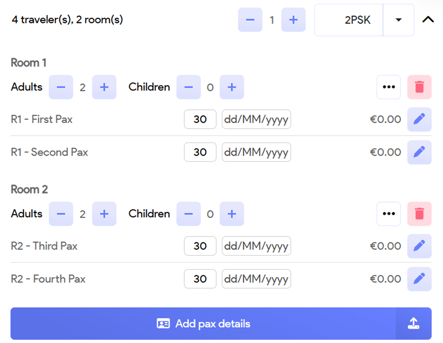
Please be aware that rooms are added in the order they are created, meaning the most recently added room will appear at the bottom of the list.
Please note that we have updated the travelers' names following the generation of the room details.
Example: Step 2 - Add 2 single rooms
In the subsequent step, we will proceed to add 2 additional single rooms to the booking.
Set the quantity to 2 and select single room in the list. By selecting the item in the list, the 2 single rooms will be added to your file.
You will now have 6 travelers accommodating 4 rooms.

Manage room
In this section you can manage the travelers in the room, delete the room.

| Field | Description |
| |
You can adjust the number of adults assigned to the corresponding room by adding (+) or removing (-) them as needed. Adding a adult, will add an extra traveler to your booking. The default age of an adult will by 30 years. |
|
You can adjust the number of children assigned to the corresponding room by adding (+) or removing (-) them as needed. Adding a child, will add an extra traveler to your booking The default age of a child will by 5 years. |
|
| |
This 3-dots icon will enable you to manage the travelers assigned to each room. |
| |
By clicking this garbage bin icon, the corresponding room will be removed from your file. |
| Field | Description |
| First name and Last name of the traveler | |
| Age of the traveler | |
| Date of birth of the traveler | |
| The per person price for this traveler. It will be the calculated by adding the per person price for each service line the passenger is assigned to. | |
| Edit travelers details. This will open the Traveler panel where you can edit the travelers data |
| Field | Description |
|---|---|
| Nickname | Informal Nickname |
| First Name | Traveler’s official first name. |
| Last Name | Traveler’s official last name. |
| Date of Birth | Required for correct pricing (e.g. child discounts). |
| Birthplace | Optional. Can be used for certain visas or insurance requirements. |
| Age | Automatically filled based on Date of Birth, or entered manually. |
| Gender | Dropdown selection (Male, Female, Others). Used for bookings/documents. |
| Nationality | Country of citizenship. |
| Preferred Language | Traveler’s preferred language (used in communication templates). |
| Email address used for communication | |
| Phone | Landline phone number (if available). |
| Mobile Number | Traveler's mobile contact. |
| Passport Issue Date | Date of passport issuance. |
| Issued Location | City or country where the passport was issued. |
| Passport Expiry Date | Expiration date of the traveler’s passport. |
| Passport Number | Passport identification number. |
| Emergency Number | Alternative phone number to reach someone in case of emergency. |
| Has Private Insurance? | Checkbox to indicate if the traveler is covered by private insurance. |
| Insurance Company | Name of the insurance provider (if applicable). |
| Head Booker | Toggle to mark this traveler as the main contact for the booking. |
| Address | Linked address (CRM entry); can be searched and selected from known entries. |
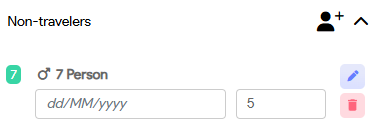
Example: Step 3 - Add a child to room 1
In the subsequent step, we will proceed to add a child to the first room in our booking. We'll pick up where we left of with the situation of 6 travelers in 4 rooms.
Add a child, by clicking the + symbol next to the Children in room one.
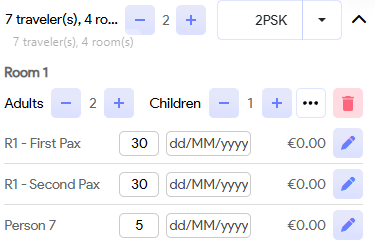
Note that an extra traveler has been added to the file. As this traveler was a child, a default age of 5 will be assigned.
Example: Step 4 - Assign the child to room 2
Select the three-dot icon next to the first room and deselect the traveler labeled as Person 7, which corresponds to the child we just added.
After your selection or deselection was made, click outside the selection list, to return to your configuration.
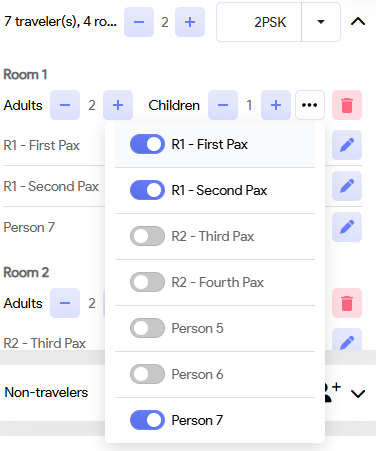
Next, select the three-dot icon next to the room 2 and select the traveler labeled as Person 7, which corresponds to the child we just added.
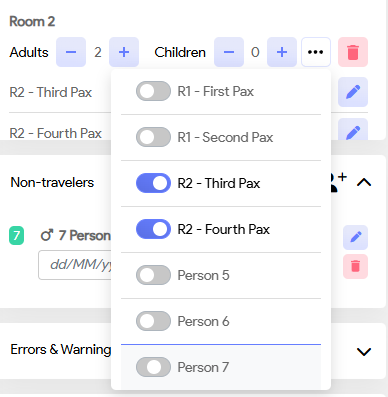
Note that during the selection process, the child will temporarily remain unassigned to any room. Consequently, you will find this child listed in the Non-travelers section.
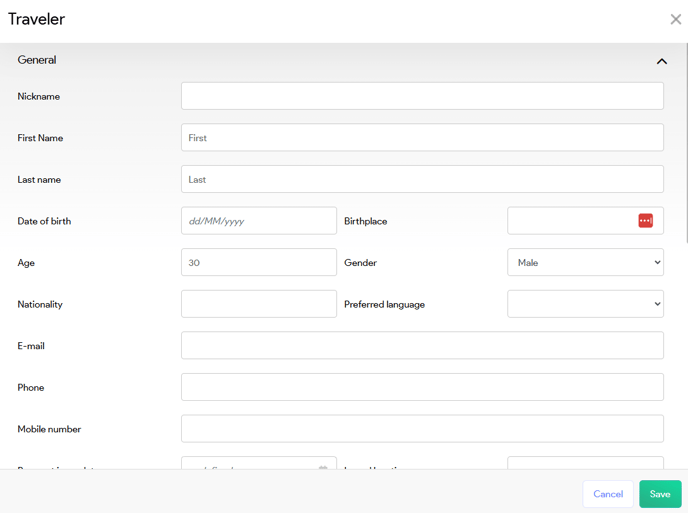
Add pax detail
This button will open the Pax details panel, where you can quickly edit all travelers. The travelers are grouped by room.
![]()
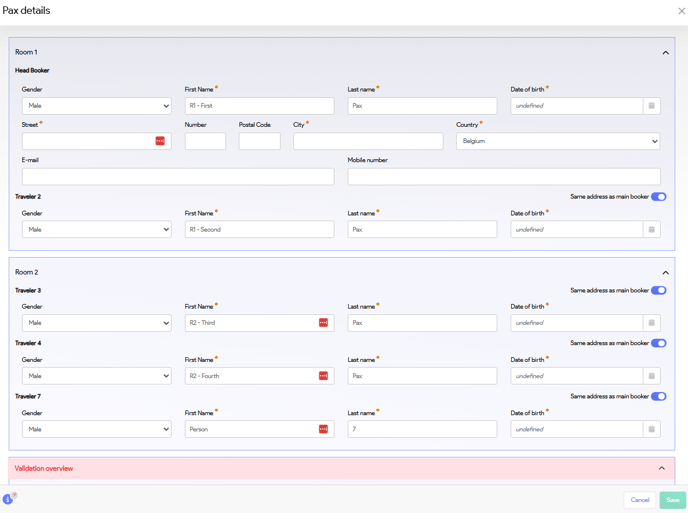
The primary booker is typically assigned to the first room, but you have the flexibility to designate a different traveler as the main booker. The fields in this section function similarly to those described in the Travelers pane, thus eliminating the need for redundant explanations.µ
The Pax details panel offers complete customization options to tailor traveler information to your specific needs.
Customize Pax details
- Navigate to Administration in the main menu
- Select Field configuration in the administration menu

- Use the pencil icon to edit the corresponding field configuration

- Switch to the Fields tab.
Here you can start configuring the fields for the pax details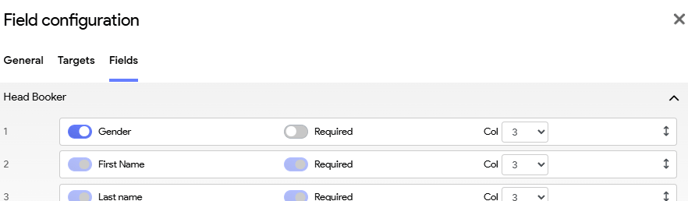
| Line # | Enable or disable field | Is the field mandatory or not | Length of the field in # columns | Change order |
